The Guitar Player's Resource
In this lesson I will do my very best to help you understand and navigate the guitar fret board in a more efficient way so that you will be able to play anywhere on the neck and improvise in any key. With this approach you will gain the freedom of expression and ability to create those original solos that you've been dying to come up with.
It can be really frustrating when you get stuck in one position on the neck of the guitar; this usually leads you to come up with a small amount of ideas with your playing. I know exactly how you feel as I used to be in this exact situation for a long time. I found the way to overcome this problem was through learning all seven major modal positions on the fret board based on 3 note per string patterns. After getting these modal positions and shapes down I set out to find as many ways of linking them together as I possibly could!
I use this strategy all the time in my own playing and have a large number of students that can confirm that this strategy works well. So if you're the kind of person that wants to play the guitar using theory to make music instead of studying the subject in books, read on!
So have a look at how the approach works:
If you know all seven modes using the 3 note per strings patterns, you can skip this step.
If you are not familiar with these shapes invest your time into memorizing all of the shapes - I promise to you that this is not so difficult and worth every minute of the practice time you dedicate into learning them. Many guitar players struggle to appreciate the power of modes due to lack of strategy to integrate them together into one logical shape. While improvising these people tend to stay within one particular mode position and if they attempt to change to another mode it usually happens by starting from the root note of the new mode position. This makes the transition from one mode to another very unnatural. The strategies given in this lesson are very straightforward and I promise that you can apply them right away.
For this approach you will need to learn how to find octaves on the guitar. Refer to the diagram below to see the shapes for finding octaves. Let's say you are on the 5th fret of the E6 string (the note 'A'), if you look diagonally to the 7th fret of the D4 String you will find your 'A 'note one octave higher. Now look diagonally at the 10th fret of the B2 String that is your 'A' note an octave higher from the previous 'A' on the 7th fret of the D4 string.

Look at the diagram below. What this shows is six notes on two adjacent strings repeated in three different octaves. Each octave for the sake of navigation belongs to a different mode position. To explain further the first six notes start in the Aeolian mode position, then the same 6 notes but an octave higher belong to the Locrian mode position and finally the last six notes belong to the Ionian mode position. (The numbers inside the red dots refer to the fingers used to fret the notes.)

Now let's take look at the tab below and explore how to play these patterns:
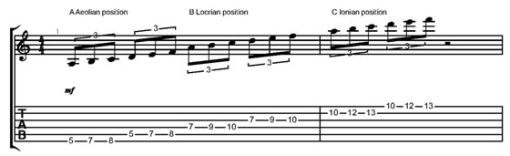
I have included below some easy but very powerful scale sequences to make things more interesting to play and listen to. I am sure that you will have a lot of fun playing them once you speed them up a bit! For the first sequence repeat the pattern on each string twice.
This sequence sounds very in keeping with neoclassical music and fun to play if you appreciate players like Yngwie Malmsteen or Paul Gilbert.
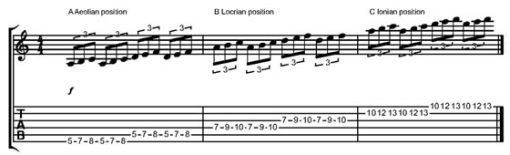
With this next sequence play the initial six notes of the first mode, then play the last three notes of the first mode together with the first two notes of the new one. To explain further I constantly repeat the same six notes in different variations in 3 different octaves. Keep in mind that I'm using the names of modes purely for the purpose of navigation, so whenever I name each mode please be aware that I'm using the names of each mode to simplify the position changes on the fret board. Each mode linked like this all belong to the same scale using this approach and is much more memorable than simply naming them 'position 1 - 7'. Here's the sequence:
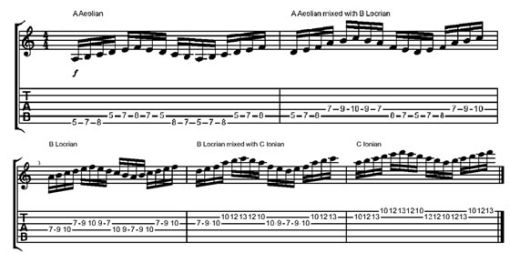
Another way of navigating the fret board is to link the modes in a linear fashion (along the fret board). To do this we will be moving from one shape to another in a linear pattern as opposed to the more well known and far more commonly used vertical technique (across the fret board where we play through strings 1 to 6 within a few frets).
This linear way of playing means that we are moving through the mode positions along the fret board instead of going across it. Thanks to this approach we can come up with some really interesting licks or phrases that will sound a little bit different to your usual scale sequences. This approach was used extensively by Yngwie Malmsteen and Paul Gilbert in mid '80s. Soloing in this linear way can grab the attention and more interestingly keep your audience interested for much longer. This is because you don't stay in one position of the neck keeping repetition to a minimum and it also physically looks more impressive. Also you don't start playing from the 6th string root note of each mode, which makes your runs more seamless, interesting and less predictable.
This is also great tool to build some tension in your music. The most basic form of soloing using the linear approach is simply playing the modes on one string. However we will focus here on playing the modes using pairs of strings for the simple reason of creating more interesting lines.
Using the diagram below look at how our modal positions link up on the fret board using the first two strings on the guitar. I have taken all seven of the Major modes positions and highlighted each of them with a different colour. Keep in mind they are part of the same mode we are playing in but the interlocking shapes are just an extension of this initial mode through all of the various mode positions. I have pointed out the root note of the initial mode within each shape but keep in mind this is not the root note of each of mode but the root note of the initial mode. This is very important!
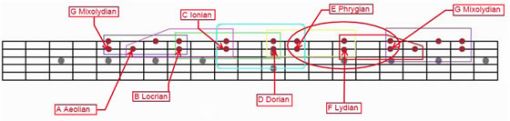
Here's a more understandable diagram of how the modal positions look like on the fret board. All seven modes are shown in order starting from G Mixolydian for simplicity. As I mentioned before we don't start these sequences from the root note of the mode but from the first note of the mode pattern.
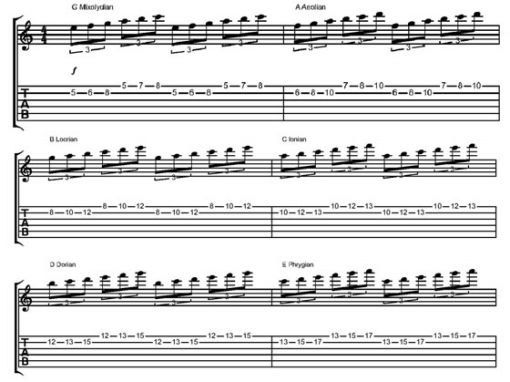
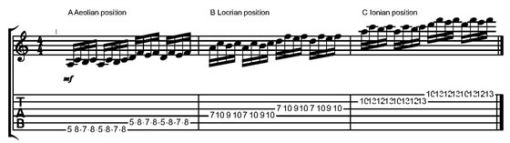
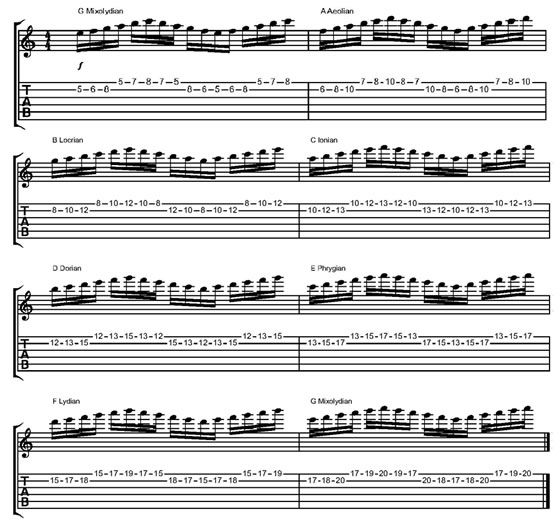
Here are some sequence ideas that can be applied to this way of thinking about the fretboard using a linear approach using pairs of strings:
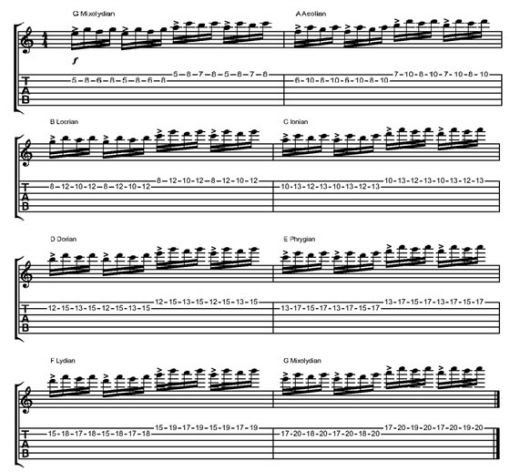
Now we have looked at these patterns let's make things a bit more complicated for fun! Find below that each first note is accented. This will help train your timing as well as your fret board visualization.
I sincerely hope that you will find the content of this article useful and can integrate everything that you have found here into your playing. Have fun with exploring the possibilities of navigating the fret board with these new approaches and rip up that fret board!
If you liked my lesson please watch the bonus video lesson on my guitar teaching website.
Greg X is a professional guitarist and guitar instructor based in London, UK, He specialises in '80s rock and metal as well as neoclassical metal.
He is currently working on his '80s rock album featuring many accomplished musicians from USA and Europe. Greg X studied music at Goldsmiths College in London, UK.
He is being mentored by the world's top guitarist and music business coach Tom Hess. He has taught over a thousand of students. He is also a founder of Wimbledon School of Guitar in London, UK.
