The Guitar Player's Resource
The right-hand finger tapping (fret board tapping) technique was popularized by Eddie Van Halen in the late 1970's. The vast majority of players tend to use the technique with only a single right-hand finger tapping on the fretboard. There have been notable exceptions such as Steve Lynch (Autograph), Jeff Watson (Night Ranger) and in the jazz realm, Stanley Jordan.
This lesson will focus on using a single right-hand finger for the tapping technique. Even here there is no single 'correct' technique. Eddie Van Halen is known for tapping with the index finger (first finger) of the right hand while holding his pick between the thumb and second finger. It would be foolish to argue that he didn't excel with this right hand method but it did require some juggling of the pick to get it out of the way.
Most players, however, hold the pick between the thumb and index finger (first finger). If the second finger of the right hand is used for the tapping technique then the normal grip on the pick can be maintained with the thumb and first finger. If you have not already perfected a different method I suggest that you learn to execute the tapping technique with the second finger of the right hand.
Before we look at music examples we should examine the common problems and mistakes that the newcomer to this technique will make. The most obvious question is how to keep the right hand steady on the fret board to allow you to accurately pluck the intended strings. When playing on the high frets, say above the 14th fret, it is sometimes possible to have the ball of the thumb (fleshy part) rest on the body of the guitar. This cannot be done when the right hand is playing on the lower frets because the hand will move beyond the body of the instrument.
One of the best techniques for steadying the right hand is to rest the third and fourth fingers on the side of the neck (treble E-string side, and thanks again Eddie). The two fingers resting on the neck can slide up and down the side of the neck to guide the hand as it is required to move up and down the fret board. It is still possible to play on the treble (thin) E-string when using this technique. You should, however, be careful to avoid unintentionally touching (muting) this string with the third and fourth fingers if you are trying to tap the E-string with the second finger.
Plucking the string with the second finger is the next problem facing the beginner. At first a beginner will have little strength and poor muscle control of the tapping finger. This often leads to the student stabbing at the strings with a stiff finger. This stabbing action requires the whole right hand to move up and down. This in turn prevents the other fingers (third and fourth fingers) from resting on the side of the neck to guide the hand along the fretboard. The result is a sloppy, inaccurate technique with little hope of improvement because there is no attempt made at developing independent movement of the tapping finger. Combine this "technique" with a dose of stage fright to hear some awful noises.
Pluck the string with the second finger of the right hand. Again, this will be difficult at first due to the weak muscle control of the finger. The good news is that finger independence can be developed even without a guitar in you hands. Place your hand on a flat surface or even rest it on your leg. Touch the tip of the first finger and thumb together as if you were holding a pick, or actually hold a pick between these fingers. Leave the third and fourth fingers resting on the flat surface. Now practice moving the second finger (your tapping finger) in a plucking motion. This is a very good method to improve the strength and independence of the second finger.
You will also have to build up a callous on the fingertip over a period of a few weeks to avoid feeling any tenderness. This is no different to the experience the left hand went through when it was learning to play!
Muting unused strings is also important for a good technique. There are six (or seven) strings on the guitar. You will probably only be intentionally playing on one of those strings when tapping with one right hand finger. If any of the other strings are accidentally played or are allowed to ring then you will produce a messy, noisy sound that is unpleasant to listen to. This is particularly true when you use an overdriven sound like most lead players.
Both the left hand and the right hand play a role in muting unwanted strings. If you are tapping on the B-string then the third or fourth finger of the right hand can be allowed to touch the top E-string to mute it and prevent it from ringing. Do not press the muted string down to touch a fret; just gently lean the third finger against the string to mute it.
Left hand fingers can also be used effectively to mute certain strings by touching them. It is also possible to have the palm or thumb of the right hand touch the bass strings to mute them when you are tapping the higher pitched (thinner) strings. Professional players use a combination of all of these muting techniques to help them produce clean and precise sounding lines.
In the following examples a tapped note is indicated by the "T" shown above the note. For tapped notes, the right hand tapping finger is indicated in the fingering guide that appears between each treble clef and corresponding line of tablature. The right hand finger tap can be thought of as similar to a hammer-on technique normally executed by the left hand.
The first few examples in this lesson cover some basic tapping techniques before we explore some more complex examples.
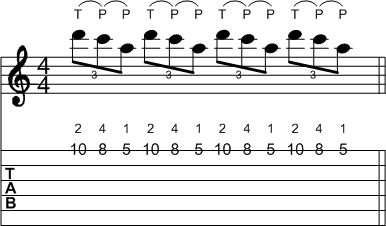
Example 1 is a simple repetitive descending triplet pattern. Tap your foot with each tap of the right hand finger and pull off to the left hand for the remaining two notes in each beat. This pattern is very effective over a D minor 7th backing.
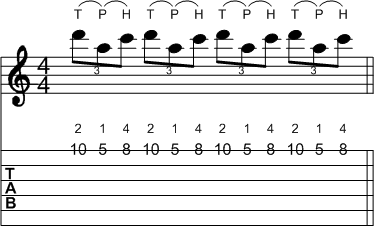
Example 2 is similar to the first example but has a slightly more complicated left hand part. The right hand tapping still occurs with the tap of the foot on each beat. Pull off to the 5th fret and then allow the left hand to hammer on the note at the 8th fret. Repeat this triplet pattern on each beat.
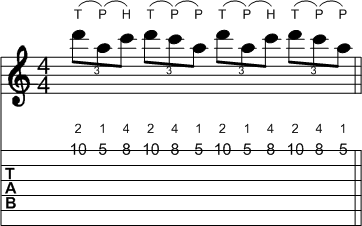
Example 3 simply combines the ideas learned in the first two examples. The first beat is identical to the first beat of example 2. The second beat is identical to that used in example 1. This six-note pattern is then repeated to complete the exercise. This obviously creates a more interesting pattern than either of the previous examples. This example uses notes from the D minor 7th arpeggio and will sound great over that backing chord.
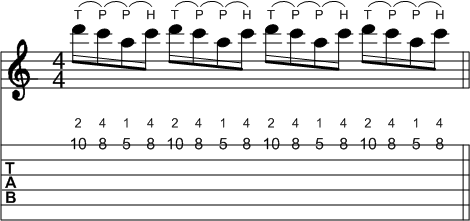
Example 4 uses a 16th note rhythm (four notes per beat). Once again, the right hand finger tap coincides with each tap of the foot at the beginning of each beat. The remaining notes in each beat are executed with left hand hammer ons and pull offs.
Now let's explore some musical examples from my instrumental CD "Electric Storm". Example 5 is a doubled tracked extract from the first track titled "Elation" and uses a 16th note triplet rhythm (6 notes per beat). The first beat has a single tapped note followed by left hand pull offs and hammer ons. The second beat features two right hand finger taps interspersed with left hand pull offs. These first two beats are repeated to complete the first bar of example 5.
The second bar of the example executes a scalar run using the notes of the F major scale combined with the finger tapping technique. The left hand is required to hammer on a note on a new string without the use of right hand picking during the second and fourth beats of the second bar.
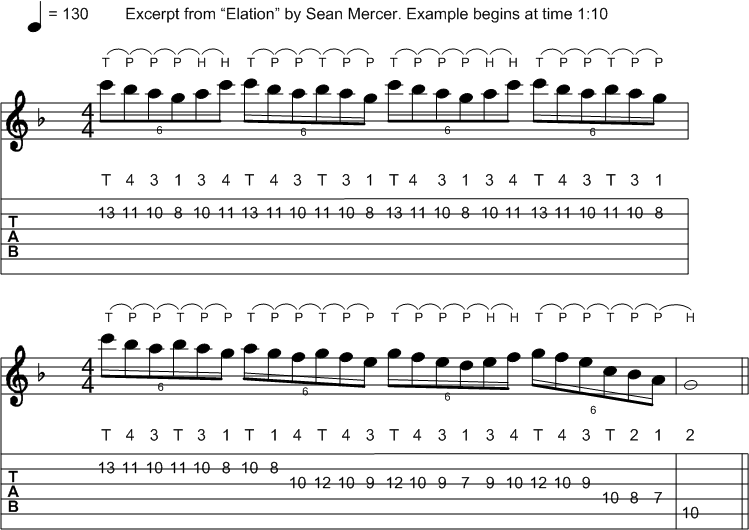
MP3 - Example 5
Example 6 is an extract from the solo section of the title track "Electric Storm". The techniques used during the first beat should now be familiar. The right hand tap occurs on the beat (with the tap of your foot) and the rest of the beat is executed with left hand pull off and hammer ons using notes from the D major scale. The 3rd and 4th fingers of the right hand are used to locate the right hand position on the neck. There are two right hand taps during the second beat and the left hand technique of hammering onto a new string without picking is also encountered during this beat. The last two beats are a diatonic sequence based on the first two beats and also use the notes of the D major scale.
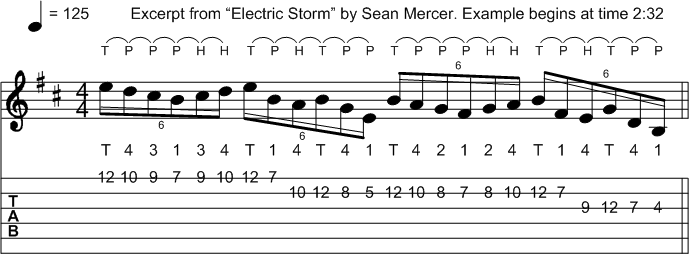
MP3 - Example 6
The extract from "Shades of Blue" shown in example 7 may not even sound like the tapping technique to many listeners. I used right hand tapping for this run simply because it was the easiest way for me to play the repeated melody notes and swing feel that I wanted. Not all tapping runs have to be at 100 miles an hour!
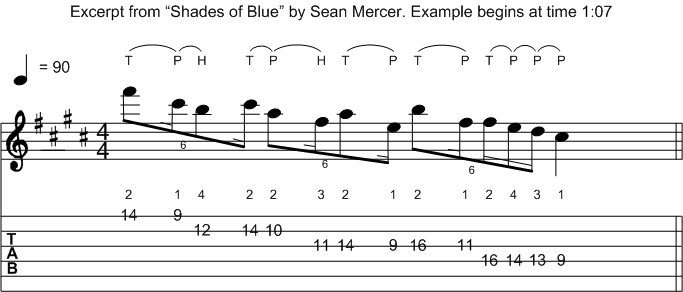
MP3 - Example 7
The A harmonic minor scale was used during the extract from the solo section of "Mushrooms of Fire" featured in example 8. This measure is played over an E7 backing. The first beat uses a combination of picking and the left hand hammer on techniques. The second beat begins with a tapped note followed by left hand hammer ons and pull offs.
The twelve-note sequence (the notes from the first two beats) begins again an octave higher at the beginning of the third beat. I used a 22 fret guitar for this solo so I had to deviate from a pure sequence and play the "D" note at the 22 fret at the beginning of the last beat. This note is still diatonic to the E7 backing. If you are using a 24 fret instrument then you could choose to play the "E" note at the 24th fret of the E-string at the beginning of the last beat.
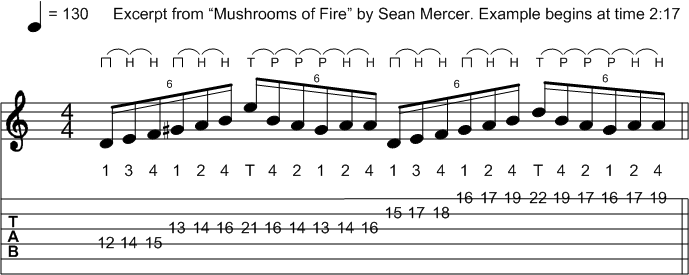
MP3 - Example 8
I hope that you have enjoyed these finger tapping examples. Please email me if you have any questions. Thanks for reading.
Sean Mercer is an accomplished producer, engineer, writer, guitarist, and keyboardist specializing in the neo-classical metal/fusion style.
His instrumental CD is entitled "Electric Storm".
